To add a meeting, simply click the "+ Add Meeting" button in the Lucid Meetings header.
If you have more than one room, select the room for your meeting from the drop-down. Select the Meeting type, then click the button for the type of scheduling you want to do. Related: Read more about Meeting Types and Templates.
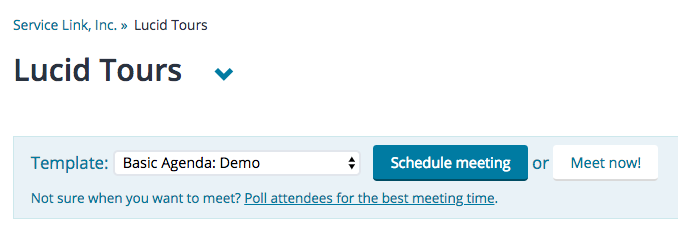
Schedule a New Meeting
When you add a meeting, you have three scheduling options:
- Poll attendees for the best meeting time: Ask people for their preference with a selection of multiple dates and times,
- Schedule meeting: Set a time for the meeting, or
- Meet now!: Start the meeting immediately.
Arrange a Time
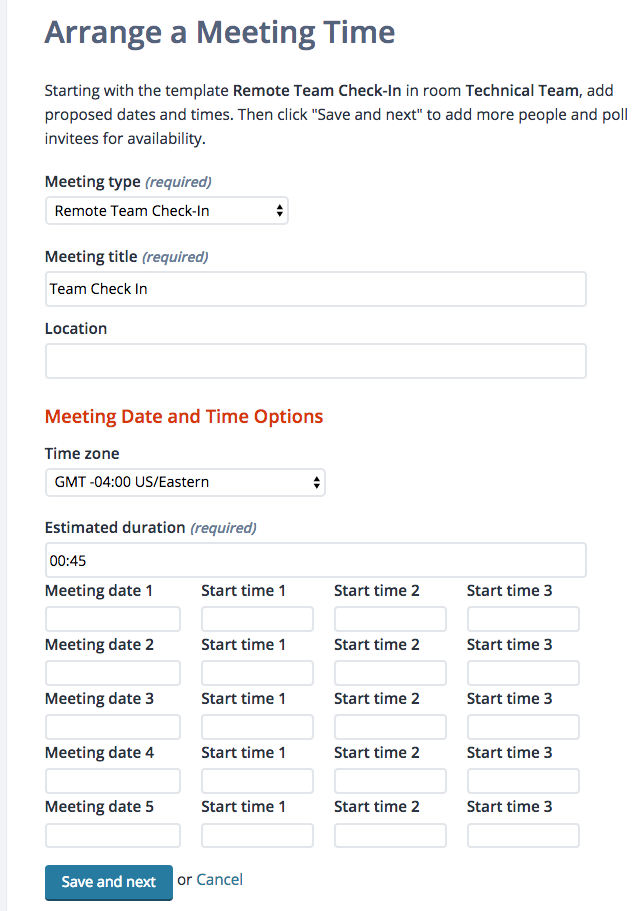
Arrange a Meeting Time
If you need to get a group together and don't know what time will work best, you can offer your invitees some options. To schedule a meeting in this way:
- Click the + Add Meeting button.
- Select the template you want to use and click Arrange a time....
- Set the title, location, time zone, and expected duration of the meeting, and enter one or more dates and times. You can enter up to five meeting dates, and up to three times on each day you enter.
- Click Save and next, and use the Add Attendees form to invite people (see Invitations, below, for more details).
- Click Add people, and you'll see the home page for your new meeting.
- Click Send invitation email to send email to the invitees. Meeting invitations will include a customized link for each person to access the meeting and indicate their availability.
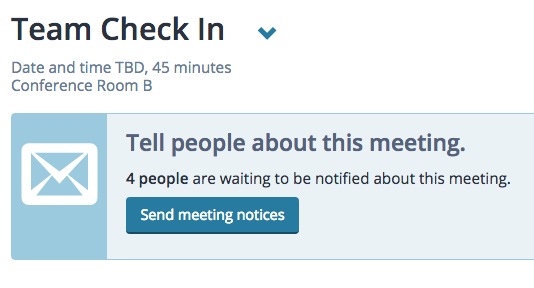
Meeting home, with "Send meeting notices" prompt
You can add more detail to the meeting (add a goal, edit the agenda, or change the settings) before sending the meeting notices. You can also send invitations at any time prior to the meeting by choosing Send meeting notices from the actions menu next to the meeting title.
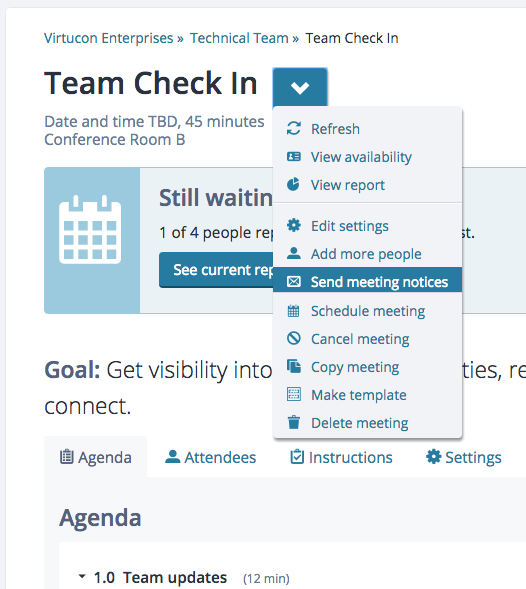
Meeting home Actions menu
Setting the Meeting Date
People invited to your meeting can log in to select their preferred meeting dates and times and enter any comments about these preferences. The Meeting Availability page shows a chart with these preferences.
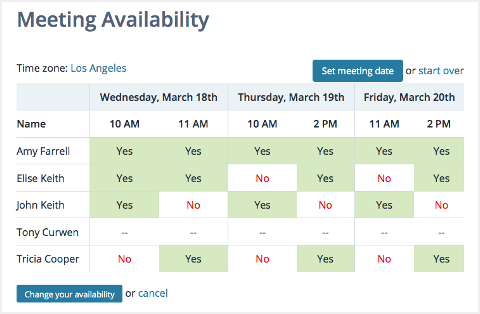
Meeting availability
Based on these responses, you can:
- Set the meeting time to the most preferred option by clicking Set Meeting Date and selecting the chosen date from the list. You will then have an opportunity to send invitations including a calendar file, which will make sure that everyone gets the new meeting date set correctly on their calendars
- Start over with a new poll by selecting start over. You can then select a new set of dates and send out new notices.
- Set a different date by selecting Schedule Meeting from the Actions menu on the Meeting Home page.
Schedule meeting
To schedule a meeting for a specific time:
- Click the +Meeting button, a room if you have more than one, and a meeting type. Then select Schedule meeting.
- Set the meeting title, date, time, repeating options, location and audio, then click Save and next.
- Click on the people you'd like to invite, select Add people, and add or edit the agenda in the next steps.
- Once your meeting looks ready, click to Send email Invitations.
To change a scheduled meeting date:
- Go to your meeting's home page.
- In the Actions menu next to the meeting title, select Reschedule Meeting.
- Select a new date and time and click Save and next.
- You will then have an opportunity to re-send invitations, which will make sure that everyone gets the new meeting date set correctly on their calendars.
Meet Now!
Click Meet Now! to start your meeting immediately. This is handy when a quick conversation suddenly turns into a meeting. You'll be prompted to add people, and Lucid Meetings will automatically send them email invitations. You can also add people to the meeting after it starts.
See How Instant Meetings Work
https://www.youtube.com/watch?v=v1vLZpmDbeI
36 second video
To Cancel a Meeting:
- Go to your meeting's home page.
- In the Actions menu next to the title, select Cancel Meeting.
- Confirm that you want to cancel the meeting.
If Lucid Meetings has already sent invitations to this meeting, it will automatically send a cancellation notice. This will update calendar entries for people whose calendars are automatically updated from their email. A "Canceled" label appears next to canceled meetings on the dashboard and in the room.
Invitations
When you've scheduled a meeting, the easiest way to let people know is to send invitations. It's important to note that Lucid Meetings does not automatically send invitation email. We want to give you the flexibility of deciding when to send the invites. You'll be prompted to send invitations after you add an agenda. Learn more about sending invitations.
Power tip! Copy Meeting
When you’re looking at the list of meetings in your meeting room, you’ll see a drop-down menu including the “Copy Meeting” button. Click this to create a new meeting based on the one you’re looking at. The copy will be scheduled at the same time and day of week as the original, and will copy everything else forward too.
For example, if I have my first meeting on Tuesday at 11am, my copy will be scheduled for the next Tuesday at 11am. Super useful for those recurring team meetings.
A note about Timezones
Dates and times in Lucid Meetings are localized to display correctly based on each person's preferred time zone, language, and time format of 12 or 24 hour time.
As the meeting facilitator, you set the meeting's official time zone when scheduling a meeting. By default, this is set to your own preferred time zone. Everyone invited to the meeting who has set their preferred time zone will see the times in their preferred zone and format.
